How to Logon to Wireless@SGx in Windows 8.1
Wireless@SG is somewhat of a joke for me.
It doesn’t work for me most of the time and when it does, it behaves like a diva, only working when you’ve fulfilled certain criteria (i.e. you HAVE to be outside of McDonalds for it to work at Lot 1). It’s still useful at at places where business isn’t great (read: low crowds), like City Square though.
The thing with Wireless@SG though is that you’ll need to manually login using the browser. This is where Wireless@SGx comes in.
Wireless@SGx, allows you to automatically connect to the free network without a manual login. Technically, this is a Singtel only service, but M1 and Starhub users should be able to sign up for a free Singtel-based Wireless@SG account and use it anyway.
The link to help you set it up is here.
But, the reason you’re here is because you’re trying to setup your Windows 8.1 laptop/tablet, but you couldn’t find security type ‘WPA-Enterprise’ and encryption type ‘TKIP’ when following the instructions for Windows 7, right?
See, I so smart.
Apparently, Microsoft deliberately removed ‘WPA-Enterprise’ as an option in Windows 8.1 citing security concerns, saying the ‘WPA2’ standard as more secure. Naturally, this earned the ire of many businesses, whose networks could only support the older ‘WPA’ standards. Also, what’s the likelihood of Singtel upgrading this anytime soon?
But, have no fear. Support for ‘WPA-Enterprice’ and ‘TKIP’ is still available in Windows 8.1. They’ve only removed the option from the user interface; Just a little tinkering in the windows command line is all that’s required.
ERMERGERD. Me feel like HERKER
So, here are the instructions, taken from Social.Technet.Microsoft.com, with some notes from me in bold:
0) Go to command line, preferably Administrator (not tried without).
1) C:\Windows\System32> cd \Users\<User>\Documents
2) C:\Users\<User>\Documents> netsh
3) netsh> wlan
4) netsh wlan> show profiles
5) delete profile name=<yournetwork>
Enclose the name of network within quotes, this is to ensure that you can cleanly set up the right profile. Don’t close the netsh, we’ll need it some more. If you do, just reach there the same way as before.
6) Right click the connection icon in lower right corner > open Network and Sharing Center > Set up a new connection or network > Manually connect to a wireless network
7) Try to create a profile, and try to get as many details to correspond with your requirement. The rest we’ll edit in command line, so let’s make it as easy as possible. (Basically, follow all steps from the Wireless@SG Windows 7 Guide – Aaron)
8) Do the same at the next screen. Edit Network settings > change all the parameters that you can, to match the requirement. My university tech support has a detailed document listing the options to choose, usually for windows 7, or even windows 8. get as many of them as possible.
9) Finish. Move back to your netsh terminal
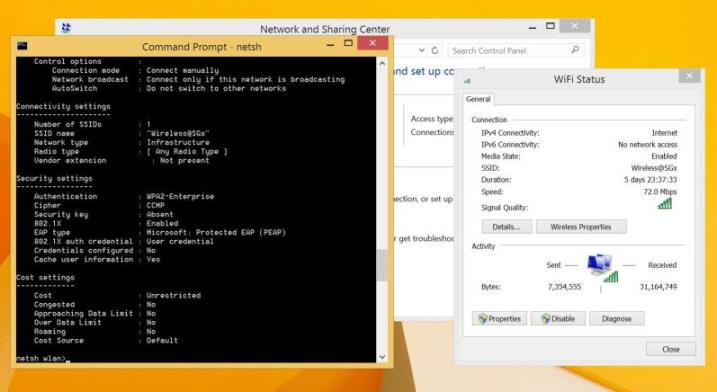
10) netsh wlan> show profile <profilename>
without quotes this time. This should show your previous attempt at creating a profile in the GUI dialog boxes. In my case, it had WPA2 and AES. It has to become WPA and TKIP. I also set my authMode to userOnly, since I hadn’t done it right in the dialog box before.
11) netsh wlan> set profileparameter
displays a humongous list of parameters with detailed options, just carefully examine the syntax. It’s all here.
12) netsh wlan> set profileparameter name=<profilename> authentication=wpa encryption=tkip authMode=userOnly (authmode not required, so just use: set profileparameter name=<profilename> authentication=wpa encryption=tkip)
13) netsh wlan> set profileparameter
Don’t exit this yet.
14) Now click the connection icon, and connect to the network. It will ask you the username and password in a different style, that was my clue something was different this time. (your wireless@sg username and password)
15) It should connect. In my case at least, it did. Verify by browsing.
16) netsh wlan> export profile name=<profile name>
In order that you’re not put through this ordeal again, export the profile safely to a file. Again, the profile name in quotes.
17) Wonder why microsoft makes things difficult for us!
—–
Well, I hope you guys found this useful. Enjoy your free, automatically connecting wifi!